MCP Application 内での A2UI 動的レンダリング
このガイドでは、Tools と Embedded Resources を使って MCP Apps 内でリッチでインタラクティブな A2UI インターフェースを提供する方法を示します。最後まで進めると、A2UI コンポーネントをレンダリングし、A2UI の相互作用を処理できる MCP App を返す MCP server が動作するようになります。MCP Apps 内で native A2UI をサポートすることで、MCP server は UI スタイルの一貫性を保ちながら、リモートエージェントと安全に協調できます。
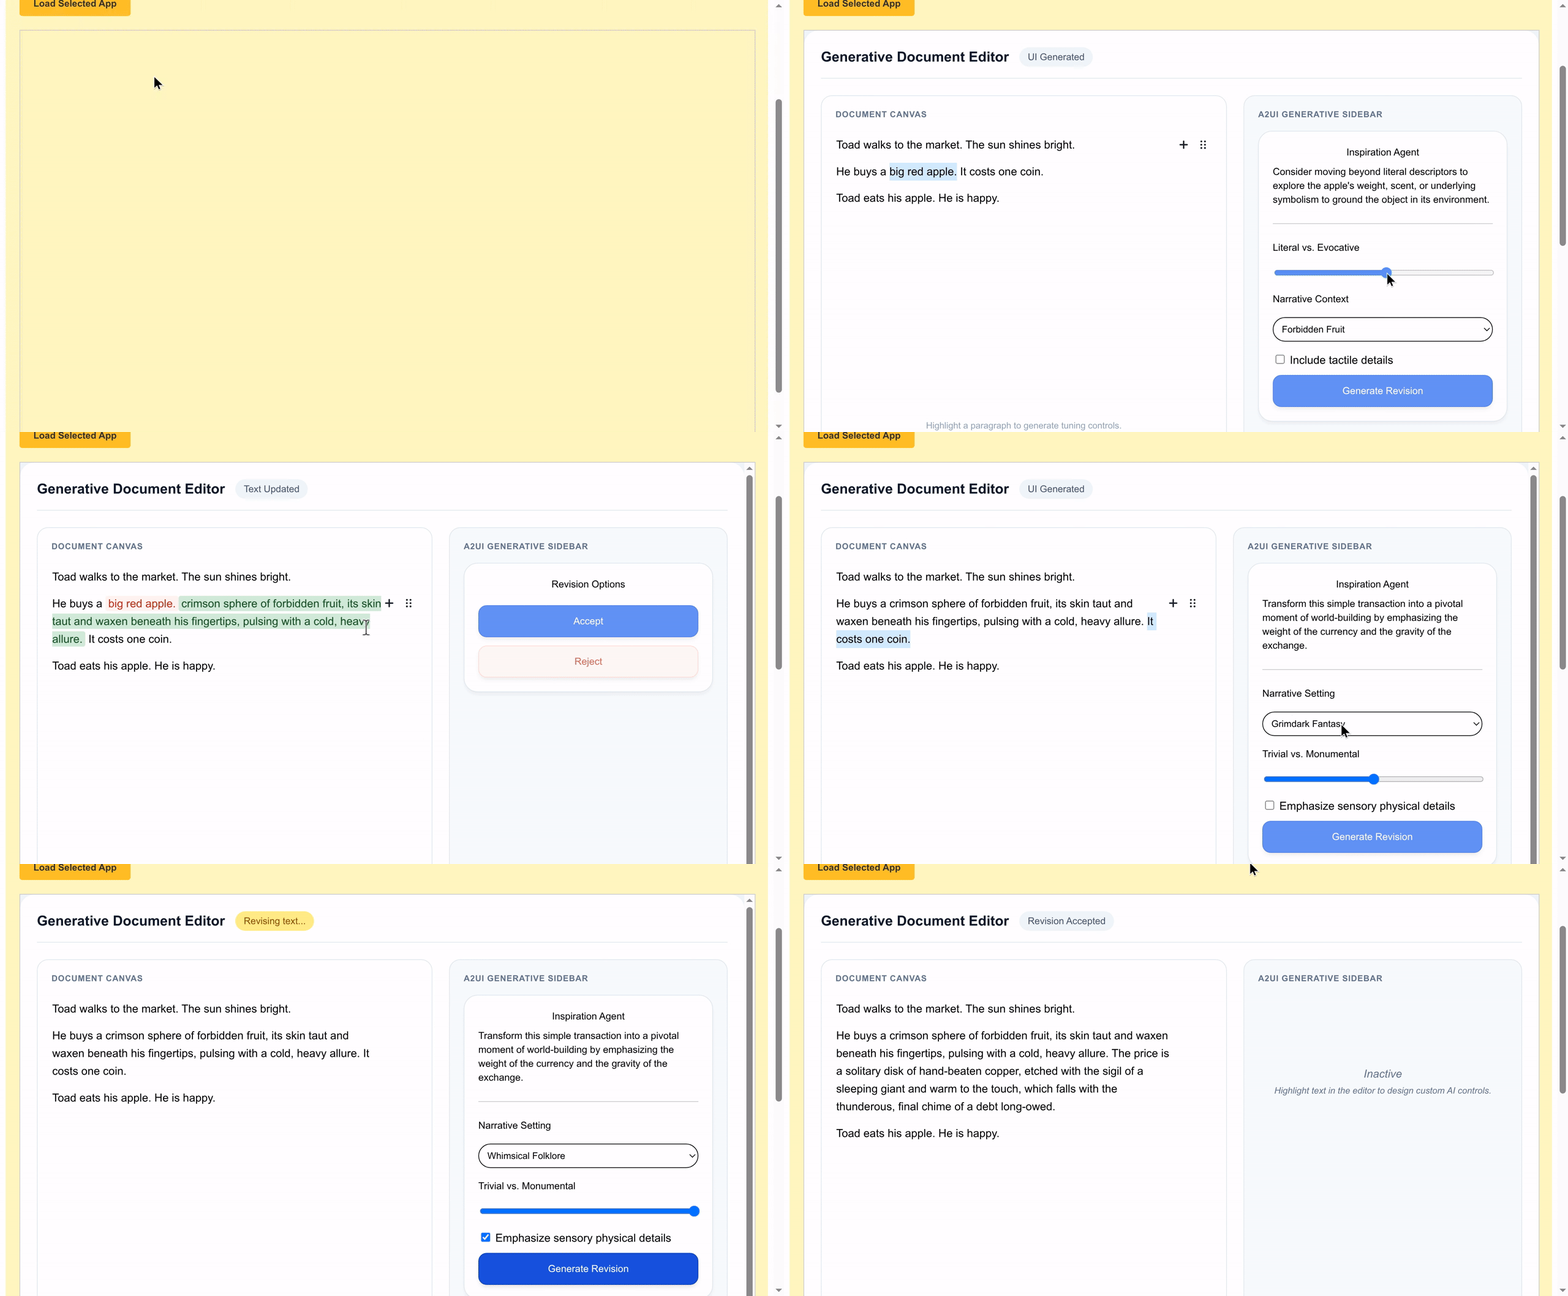
前提条件
- Python 3.10+
- uv — 高速な Python パッケージマネージャー
- Node.js 18+ (MCP Inspector 用)
Quick Start: サンプルを実行する
このサンプルを実行する詳しい手順は、README.md を参照してください。
アーキテクチャ概要
このシステムは、通信チェーンを通じて相互作用する 3 つの主要 actor で構成されます。
- クライアントホストアプリケーション: MCP Server に接続し、MCP App の安全な sandbox を host する外側のコンテナです(例: Angular app)。
- MCP Application (Sandboxed): double-iframe sandbox 内で動作する、信頼されないサードパーティ Web アプリケーションです(例: Lit または Angular micro-app)。この app には A2UI surface が含まれます。
- MCP Server: アプリケーションリソースを提供し、tool call を処理する backend server です。
flowchart TD
    %% Style Definitions
    classDef client fill:#e8f0fe,stroke:#1a73e8,color:#185abc,stroke-width:2px
    classDef server fill:#f1f3f4,stroke:#3c4043,color:#202124,stroke-width:2px
    classDef agent fill:#eef3fc,stroke:#74a0f7,color:#185abc,stroke-width:2px

    %% 1. Top: AI Agent Environment
    subgraph AgentEnv ["Server-Side Environment"]
        direction LR
        Agent["Generative A2UI Agent (e.g., Smart Agent)"]:::agent
        MCPServer["MCP Server"]:::server
    end

    %% 3. Bottom: Client-Side Environment
    subgraph ClientEnv ["Client-Side Environment"]
        Host["Client Host Application"]:::client

        subgraph SandboxBound ["Double-IFrame Sandbox"]
            subgraph McpApp ["MCP App (e.g., Editor App)"]
                direction TB
                %% Added a dedicated node for the app logic to prevent child-to-parent layout collapse
                AppLogic["Web Native App<br/>(e.g., Editor Panel)"]:::client
                A2UISurface["A2UI Surface<br/>(e.g., Controls Panel)"]:::client
                AppBridge["App Bridge"]:::client
                A2UIRenderer["A2UI Rendering Engine"]:::client

            end

            %% Changed connection to target the node inside, not the subgraph wrapper
            AppBridge -->|"A2UI JSON"| A2UIRenderer
            A2UIRenderer -.->|"Mounts & renders dynamic controls inside"| A2UISurface
            A2UISurface -->|"User Action<br/>(e.g., Generate text)"| AppBridge
            AppLogic -->|"Context Trigger<br/>(e.g., Highlight text)"| AppBridge
            AppBridge -->|"Update (e.g., Revised text)"| AppLogic
            A2UISurface -->|"Update<br/>(e.g., Accept/Reject)"| AppLogic
        end

        Host <-->|"postMessage Bridge"| AppBridge
    end

    %% --- Strictly Vertical Stacking Connections ---
    Agent <==>|"Delegation & Payload"| MCPServer
    MCPServer <==>|"MCP Protocol"| Host

    %% --- Local Context Flow Indicators ---
    %% Updated links to point to AppLogic instead of the McpApp subgraph
深掘り: 通信フロー
このパターンの重要な点は、MCP App が A2UI payload を直接レンダリングすることです。Client Host Application にレンダリングを任せません。
MCP Apps で A2UI コンポーネントを読み込む
MCP Apps に A2UI コンポーネントを動的に読み込むイベントの流れは次のとおりです。
- Trigger: MCP App が UI コンテンツを取得または更新する必要があると判断します(例: 初期化時、またはユーザー起点の Action)。
- Request: MCP App が
window.parent.postMessageを通じて Host に JSON-RPC リクエストを送ります。- Example Method:
ui/fetch_counter_a2ui
- Example Method:
- Relay: Sandbox Proxy がこのメッセージを Client Host に relay します。
- MCP Call: Client Host がこの custom message を、MCP Server への標準 MCP
tools/callリクエストに変換します。- Example Tool:
fetch_counter_a2ui
- Example Tool:
- Response: MCP Server が tool を実行し、
application/json+a2uiresource を含む result を返します。 - レスポンス転送: Host が tool result を受け取り、Sandbox Proxy を通じて MCP App へ戻します。
- レンダリング: MCP App が resource から A2UI JSON payload を抽出し、ローカル A2UI
MessageProcessorに渡して A2UI surface を動的に更新します。
ユーザーアクションの処理
レンダリングされた A2UI surface 内の相互作用は、流れを逆向きにして処理されます。
- ユーザーが MCP App 内の A2UI surface でボタンをクリックします。
- A2UI コンポーネントが
userActionをトリガーします。 - MCP App が A2UI
MessageProcessor.eventsの購読を通じてこの event をキャプチャします。 - MCP App が action をパッケージし、JSON-RPC メッセージとして Host に送ります(例:
ui/increase_counter)。 - Host が MCP Server 上の対応する tool を呼び出します。
- Server が更新後の状態を表す新しい A2UI payload を返し、それが MCP App へ pipe されてレンダリングを更新します。
Sequence Diagram
sequenceDiagram
    participant Server as MCP Server
    participant Host as Client Host Application
    participant Proxy as Sandbox Proxy
    participant App as MCP App (Sandbox)
    participant A2UI as A2UI Surface

    rect rgb(240, 248, 255)
    Note right of Server: INITIALIZATION & LOADING
    Note over Host: 1. Loaded from Hosting server
    Host->>Server: 2. Fetch MCP App resource
    Server-->>Host: Return MCP App resource
    Host->>Proxy: 3a. Load Sandbox Proxy
    Proxy->>App: 3b. Serve App in isolated iframe
    Note over App: 4. User action triggers resource  request
    App->>Proxy: Request tool call
    Proxy->>Host: Relay Request
    Host->>Server: Forward Tool Call
    Server-->>Host: 5. Respond with A2UI JSON payload
    Host->>Proxy: Relay payload
    Proxy->>App: 6. Hand down payload to MCP App
    App->>A2UI: 7. Renders A2UI Components
    end

    rect rgb(255, 245, 238)
    Note right of Server: USER INTERACTION
    Note over A2UI: Click on A2UI Button
    A2UI->>App: 8. A2UI Button triggers UserAction
    Note over App: 9. Translate A2UI UserAction to JSON-RPC message
    App->>Proxy: Forward JSON-RPC message
    Proxy->>Host: Relay JSON-RPC message
    Note over Host: 10. Map Action to Tool Call
    Host->>Server: Forward Tool Call
    Server-->>Host: 11. Respond with A2UI payload (datamodelupdate)
    Host->>Proxy: Relay payload
    Proxy->>App: 12. Pipe payload to MCP App
    App->>A2UI: Update rendering
end実装方法
A2UI 機能を持つ独自 MCP App を構築するには、次の手順に従います。
Step 1: レンダラーをインライン化する
MCP Apps は通常、MCP Server から単一の HTML resource として配信されます。Angular や React のようなモダンフレームワークでこれを実現するには、次を行います。
- アプリケーションを通常どおりビルドし、static assets(
index.html,.js,.css)を生成します。 - サンプルの
inline.jsのような post-build script を使い、index.htmlを読み取って、外部の<script src="...">と<link rel="stylesheet" href="...">タグを、実際のファイル内容を含む inline<script>と<style>タグへ置き換えます。 - 制限付き iframe で
srcdocにより安全に読み込める self-contained HTML ファイルが生成されます。
[!TIP] Vite で inline 化する
プロジェクトが Vite を使っている場合(React、Vue、Lit で一般的)、
vite-plugin-singlefileのようなプラグインを使って同じ single-file 出力を自動化できます。これにより、ビルド中に inline 化が処理されるため、custom post-build script は不要になります。使い方:
プラグインをインストール:
Vite を設定:
vite.config.ts(または.js)にプラグインを追加します。import {defineConfig} from 'vite'; import {viteSingleFile} from 'vite-plugin-singlefile'; export default defineConfig({ plugins: [viteSingleFile()], });これにより、ビルド時にすべての JS と CSS assets が
index.htmlファイルへ inline 化され、MCP server から単一 resource として提供できる状態になります。
Step 2: A2UI-over-MCP を活用する
インライン化された app は sandbox 内で実行されています。A2UI を活用するには、次を行います。
- app bundle に A2UI Angular/Lit ライブラリを含めます。
- MCP Server とやり取りするため、Host との通信契約を定義します。
- Host から応答を受け取ったら、content 内の
application/json+a2uimimeType を探します。 - JSON text をパースし、A2UI
MessageProcessorに渡します。
例: A2UI の取得とレンダリング
// 1. Request A2UI data from Host
const result = await callHostMethod('ui/fetch_counter_a2ui');

// 2. Find and parse the A2UI resource
const a2uiResource = result.find(
  c => c.type === 'resource' && c.resource?.mimeType === 'application/json+a2ui',
);

if (a2uiResource?.resource?.text) {
  const messages = JSON.parse(a2uiResource.resource.text);
  this.processor.processMessages(messages);
}

// Utility for JSON-RPC communication
function callHostMethod(method: string, params: any = {}): Promise<any> {
  return new Promise((resolve, reject) => {
    const requestId = `${method}-${Date.now()}`;

    const handler = (event: MessageEvent) => {
      if (event.data.id !== requestId) return;
      window.removeEventListener('message', handler);

      if (event.data.error) {
        reject(event.data.error);
      } else {
        resolve(event.data.result);
      }
    };

    window.addEventListener('message', handler);

    window.parent.postMessage(
      {
        jsonrpc: '2.0',
        id: requestId,
        method,
        params,
      },
      '*',
    ); // Note: Replace "*" with explicit target origin in production
  });
}
Step 3: A2UI コンポーネントのユーザーアクションを処理する
レンダリングされた A2UI surface 内の相互作用を処理するには、MCP App が A2UI event をキャプチャし、JSON-RPC を使って Host へ転送する必要があります。
例: ユーザーアクションの処理
// Subscribing to A2UI events in the MCP App ([main.ts](https://github.com/google/A2UI/blob/main/samples/mcp/a2ui-in-mcpapps/server/apps/src/src/main.ts))
this.processor.events.subscribe(async event => {
  if (!event.message.userAction) return;

  const method = `ui/${event.message.userAction.name}`;
  const params = event.message.userAction.context;

  try {
    // Translate A2UI UserAction to JSON-RPC, send to Host, and await response
    const result = await callHostMethod(method, params);

    // Parse the updated A2UI payload and update the rendering
    const messages = extractA2UIMessages(result);
    if (messages) {
      this.processor.processMessages(messages);
    }
  } catch (error) {
    console.error(`Error handling user action[${method}]:`, error);
  }
});
このパターンにより、MCP App は厳格なセキュリティ分離を維持しながら、MCP Server の A2UI 機能に対する動的インターフェースとして機能できます。
Inlined MCP App HTML Pseudocode
すべてをまとめると、次はコンパイルされインライン化された MCP Application を表す HTML mockup です。native <a2ui-surface> 要素を持つ placeholder UI を定義し、外側の host と通信するために AppBridge を初期化し、読み込み時に dynamic A2UI layout を取得し、読み込まれた A2UI SDK で event を処理します。
<!DOCTYPE html>
<html lang="en">
  <head>
    <meta charset="UTF-8" />
    <title>Inlined MCP App Surface</title>
    <!-- Assumes the standard A2UI SDK script is bundled or loaded -->
  </head>
  <body>
    <div>
      <h3>MCP App (Editor Panel)</h3>
      <p>This text is native to the sandboxed third-party app.</p>

      <!-- A2UI Surface custom element provided by the A2UI SDK -->
      <a2ui-surface surfaceId="recipe-card"></a2ui-surface>
    </div>

    <script>
      // Note: The pseudocode below assumes AppBridge from @modelcontextprotocol/ext-apps
      // and a2uiProcessor from the A2UI SDK are preloaded or inlined.
      const bridge = new AppBridge({name: 'editor-panel', version: '1.0.0'});

      // Helper to extract and process dynamic A2UI responses from tool results
      function processA2UIResponse(result) {
        const a2uiResource = result?.content?.find(
          c => c.type === 'resource' && c.resource?.mimeType === 'application/json+a2ui',
        );
        if (a2uiResource?.resource?.text) {
          const payload = JSON.parse(a2uiResource.resource.text);
          window.a2uiProcessor.processMessages(payload);
        }
      }

      // 1. Initialize AppBridge and fetch initial controls
      async function initApp() {
        await bridge.connect();

        // Call server tool to load initial layout controls
        const result = await bridge.callServerTool({name: 'fetch_controls', arguments: {}});
        processA2UIResponse(result);
      }

      // 2. Handle interactive User Actions routed by the A2UI SDK
      window.a2uiProcessor.events.subscribe(async event => {
        if (!event.message.userAction) return;
        const action = event.message.userAction;

        // Route the user action directly via the bridge to the MCP Server tool
        const result = await bridge.callServerTool({
          name: action.name,
          arguments: action.context,
        });

        // Feed any updated server UI states back to the A2UI processor
        processA2UIResponse(result);
      });

      // Initialize the app on startup
      initApp();
    </script>
  </body>
</html>
セキュリティ上の考慮事項
- 明示的な Target Origin: host origin が分かっている場合、
postMessageを呼び出すときは常に*ではなく具体的な target origin(例:'https://trusted-host.com')を使ってください。これにより、悪意ある iframe が RPC リクエストを傍受するのを防げます。 - Null Origin の扱い: 厳格な sandbox(
allow-same-originなしのsandbox="allow-scripts")内では、window.location.originが"null"と評価されることを覚えておいてください。event.sourceを期待される window object(例:window.parent)と比較し、受信メッセージを慎重に検証する必要があります。